How To Change Transfer Case Fluid
When it comes to maintaining your vehicle’s performance, one aspect that often gets overlooked is the transfer case fluid. Did you know that neglecting to change the transfer case fluid can lead to serious damage and costly repairs down the road? It’s true! Just like any other fluid in your vehicle, the transfer case fluid needs to be changed regularly to ensure optimal performance and longevity. So, let’s delve into the key steps of how to change transfer case fluid to keep your vehicle running smoothly.
Changing the transfer case fluid is a straightforward process that can be done by following a few simple steps. First, gather the necessary tools and equipment, such as a wrench, drain pan, and new transfer case fluid. Then, locate the transfer case and remove the fill plug to allow the old fluid to drain out. Once all the old fluid has drained, reinstall the drain plug and proceed to fill the transfer case with the appropriate type and amount of new fluid. Finally, don’t forget to check for any leaks and test the vehicle’s performance to ensure everything is functioning as it should. By regularly changing the transfer case fluid, you can prevent wear and tear, maintain proper lubrication, and extend the lifespan of your vehicle’s transfer case.
To change the transfer case fluid, follow these steps:
- Ensure the vehicle is parked on a level surface and the engine is turned off.
- Locate the drain and fill plugs on the transfer case.
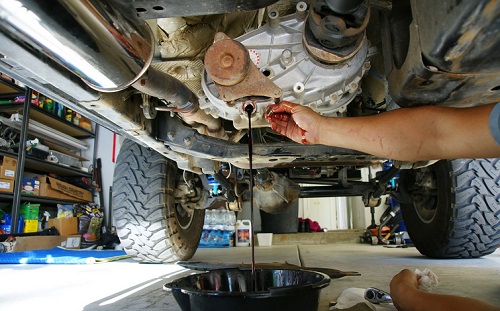
- Place a drain pan underneath the drain plug and remove it to allow the old fluid to drain completely.
- Once drained, reinstall the drain plug.
- Using a hand pump or fluid transfer pump, fill the transfer case with the recommended fluid until it reaches the fill plug.
- Reinstall the fill plug.
- Start the engine and let it idle for a few minutes to circulate the new fluid.
- Check for any leaks and ensure the fluid level is correct.
 SONY DSC
The Importance of Changing Transfer Case Fluid
Your vehicle’s transfer case is responsible for sending power from the transmission to the front and rear axles, allowing your vehicle to engage in four-wheel drive. Like any other component of your vehicle, the transfer case requires regular maintenance to ensure optimal performance and longevity. One vital maintenance task is changing the transfer case fluid. By regularly changing the transfer case fluid, you can prevent premature wear and tear, maintain proper lubrication, and extend the life of your transfer case. In this article, we will guide you through the process of changing transfer case fluid, providing you with expert-level instructions and tips.
1. Gather the Necessary Tools and Supplies
Before you begin the process of changing the transfer case fluid, it is essential to gather all the necessary tools and supplies. Here’s a list of items you’ll need:
Make sure you have all these items readily available before you start the process.
2. Locate the Transfer Case
The next step is to locate the transfer case in your vehicle. The transfer case is typically positioned between the transmission and the front or rear differential. Refer to your vehicle’s owner’s manual or consult a repair guide specific to your make and model for precise instructions on locating the transfer case.
Once you have identified the transfer case, park your vehicle on a level surface and engage the parking brake to ensure stability.
It’s also essential to note that some vehicles may require raising the vehicle with a jack and supporting it with jack stands to access the transfer case easily. Follow proper safety procedures when working under a lifted vehicle.
3. Drain the Old Fluid
Now that you have all the necessary tools and have located the transfer case, it’s time to drain the old fluid. Follow these steps:
Once the old fluid has drained, clean the drain plug with a shop towel or rag and set it aside for later use.
3.1 Choosing the Right Transfer Case Fluid
When it comes to choosing the correct transfer case fluid, it’s crucial to consult your vehicle’s owner’s manual or contact the manufacturer for the recommended fluid type. Using the wrong fluid can lead to damage to your transfer case and other drivetrain components.
Once you have determined the appropriate fluid type, ensure you have the correct amount available for the refill later in the process.
4. Refill with New Fluid
Now that the old fluid has been drained, it’s time to refill the transfer case with new fluid. Follow these steps:
After refilling the transfer case, it’s essential to clean up any spilled fluid and ensure that all plugs and bolts are securely tightened.
5. Test and Check for Leaks
After completing the fluid change, it’s crucial to test your transfer case and check for any signs of leaks. Follow these steps:
If everything looks and sounds normal, your transfer case fluid change is complete! Remember to dispose of the old fluid responsibly, following local regulations for oil recycling.
Changing Transfer Case Fluid: A Step-by-Step Guide
Regularly changing the transfer case fluid in your vehicle is essential for maintaining its efficiency and performance. Here is a step-by-step guide on how to change transfer case fluid:
Tools and Materials Needed
Step-by-Step Procedure
1. Safely lift your vehicle and support it with jack stands or ramps. Ensure it is securely stabilized.
2. Locate the transfer case underneath your vehicle.
3. Place a drain pan underneath the transfer case and remove the fill plug using a socket set.
4. Allow the old fluid to drain completely into the pan.
5. Clean the threads of the fill plug and transfer case opening using a cloth.
Home - How To Change Transfer Case Fluid