How To Repair Transmission Cooler Line?
When it comes to the complex and critical components of a vehicle, the transmission cooler line ranks high on the list. Did you know that the transmission cooler line is responsible for keeping the transmission fluid cool, preventing it from overheating and causing damage to the transmission? This often overlooked part plays a crucial role in the overall performance and longevity of a vehicle’s transmission system.
Repairing a transmission cooler line requires precision and a thorough understanding of the transmission system. Over time, these lines can become damaged due to wear and tear or external factors such as road debris or accidents. A leak in the transmission cooler line can lead to a loss of transmission fluid, resulting in poor performance and potential damage to other parts of the transmission system. By identifying the location of the leak and using the appropriate tools and techniques, professional technicians can effectively repair transmission cooler lines, ensuring optimal performance and protecting the longevity of the transmission.
To repair a transmission cooler line, follow these steps:
- Jack up the vehicle and secure it with jack stands for safety.
- Locate the damaged cooler line and carefully disconnect it from the radiator and transmission.
- Inspect the line for any cracks, leaks, or damage. If necessary, replace the line with a new one.
- Apply a small amount of thread sealant or Teflon tape to the fittings to prevent leaks.
- Reconnect the new transmission cooler line to the radiator and transmission.
Ensure the fittings are tightened securely, and then lower the vehicle. Test for any leaks and monitor the transmission fluid levels regularly to ensure proper functioning.
Understanding the Transmission Cooler Line
The transmission cooler line plays a crucial role in keeping your vehicle’s transmission system cool and functioning optimally. As the name suggests, it is responsible for cooling the hot transmission fluid before it flows back into the transmission. This helps prevent overheating and damage to the transmission, ensuring smooth operation.
However, transmission cooler lines can develop leaks or become damaged over time. When this happens, it is essential to address the issue promptly to avoid further damage to the transmission and potential costly repairs. In this article, we will guide you through the process of repairing a transmission cooler line to ensure your vehicle’s transmission system operates efficiently for years to come.
Identifying the Transmission Cooler Line Issue
The first step in repairing a transmission cooler line is identifying the issue. Here are some common signs that indicate a problem with the transmission cooler line:
- Visible fluid leaks underneath the vehicle
- Low transmission fluid levels
- Transmission overheating
- Unusual noises or vibrations coming from the transmission
If you notice any of these signs, it is essential to inspect the transmission cooler line for leaks or damage.
Inspecting the Transmission Cooler Line
Before attempting any repairs, it is crucial to thoroughly inspect the transmission cooler line to determine the extent of the damage and the best course of action. Here’s how you can inspect the transmission cooler line:
- Visually inspect the cooler lines for any visible signs of damage, such as cracks, rust, or corrosion.
- Feel the cooler lines with your hand to check for any soft or swollen areas, which could indicate a leak.
- Clean the cooler lines and surrounding area to remove any dirt or debris that might be masking the issue.
- Use a flashlight to get a better view of the cooler lines, especially in hard-to-reach areas.
By thoroughly inspecting the transmission cooler line, you can determine whether it can be repaired or if it needs to be replaced entirely.
Repairing Small Leaks or Damage
If the transmission cooler line has small leaks or minor damage, it may be possible to repair it rather than replacing the entire line. Here’s how you can repair small leaks or damage:
- Start by cleaning the area around the affected area with a degreaser to remove any grease or oil buildup.
- Once the area is clean, use sandpaper or a wire brush to roughen the surface around the leak or damaged area.
- Apply a small amount of epoxy or a high-temperature sealant to the affected area, covering the leak or damage completely.
- Allow the epoxy or sealant to dry thoroughly, following the manufacturer’s instructions.
- After the epoxy or sealant has dried, check for any additional leaks or damage.
It’s important to note that this method is only suitable for small leaks or minor damage. If the damage is extensive or the line is severely deteriorated, it is best to replace the entire transmission cooler line.
Replacing the Transmission Cooler Line
If the transmission cooler line has extensive damage or is beyond repair, it is necessary to replace it. Here’s a step-by-step guide on how to replace the transmission cooler line:
- Drain the transmission fluid by removing the transmission cooler line fittings from the transmission.
- Remove the damaged transmission cooler line by loosening the fittings at both ends.
- Clean the fittings and the surrounding area to remove any dirt or debris.
- Install the new transmission cooler line by tightening the fittings at both ends.
- Refill the transmission with the appropriate type and amount of fluid.
- Start the engine and check for any leaks.
- Ensure the transmission fluid level is within the recommended range.
It is essential to follow the manufacturer’s guidelines and specifications when replacing the transmission cooler line to ensure proper installation.
Preventing Future Transmission Cooler Line Issues
Once you have repaired or replaced the transmission cooler line, it is crucial to take steps to prevent future issues. Here are some preventive measures you can take:
- Regularly inspect the transmission cooler lines for any signs of damage or leaks.
- Keep the area around the transmission cooler lines clean and free from debris.
- Follow the manufacturer’s recommended maintenance schedule for the transmission system.
- Ensure the transmission fluid is at the correct level and replaced as per the manufacturer’s guidelines.
By following these preventive measures, you can prolong the lifespan of your transmission cooler lines and prevent costly repairs in the future.
The Importance of Professional Assistance
While some transmission cooler line repairs can be done by experienced DIYers, it is important to note that working on the transmission system requires technical knowledge and expertise. If you are not confident in your abilities or unsure about the extent of the damage, it is highly recommended to seek professional assistance. Certified mechanics have the necessary tools, skills, and experience to accurately diagnose and repair transmission cooler line issues, ensuring the safety and longevity of your vehicle.
To sum it up, the transmission cooler line is a critical component of your vehicle’s transmission system. Regular inspection, timely repairs, and necessary replacements are essential to keep the transmission running smoothly and prevent costly damages. By following the steps outlined in this article and seeking professional help when needed, you can ensure that your transmission cooler line remains in top condition, enhancing the overall performance and reliability of your vehicle.
How To Repair Transmission Cooler Line?
If you are facing issues with your transmission cooler line and want to repair it yourself, here is a step-by-step guide to help you through the process.
Materials and Tools Needed:
- Replacement transmission cooler line
- Wrenches
- Jack stands
- Pliers
- Bucket or drain pan
- Rubber gloves
- Safety glasses
- Shop towels
- Transmission fluid
Repair Process:
- Step 1: Park your vehicle on a level surface and engage the parking brake.
- Step 2: Locate the damaged transmission cooler line.
- Step 3: Place a bucket or drain pan beneath the damaged line to catch any leaking fluid.
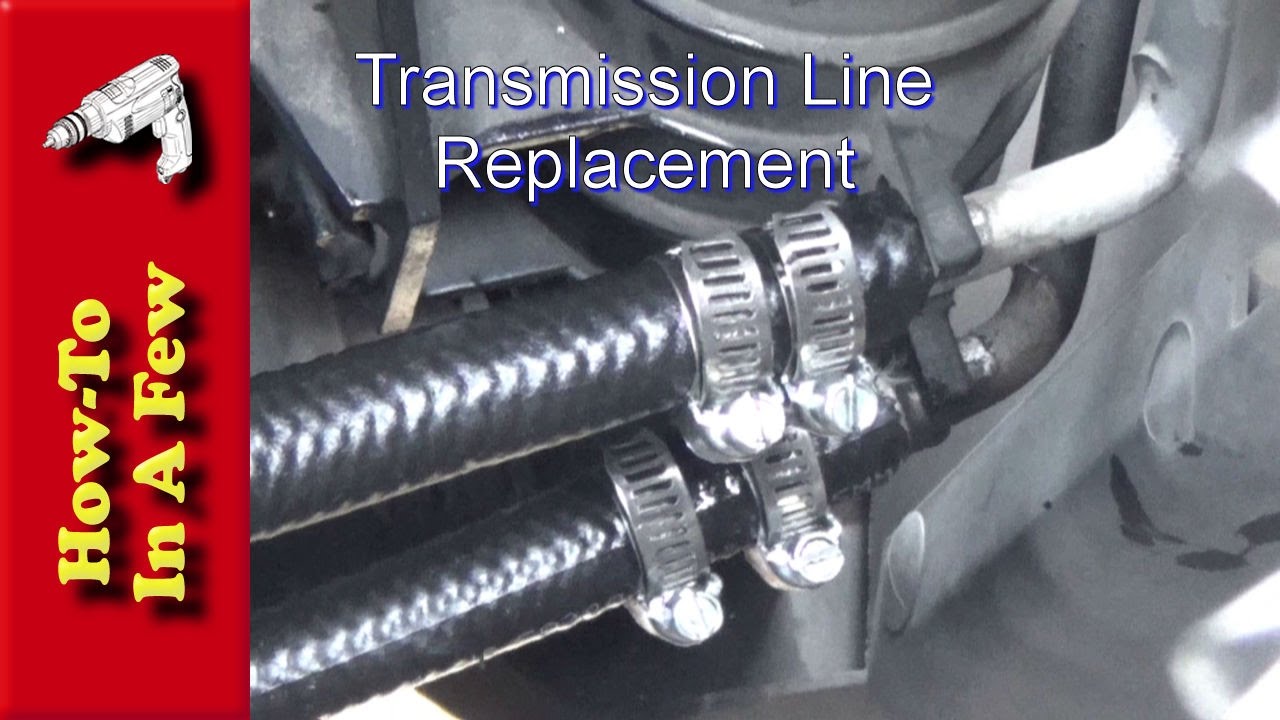
- Step 4: Use pliers or wrenches to remove the clamps securing the line to the transmission and the radiator.
- Step 5: Gently pull the line away from the connection points.
- Step 6: Install the replacement transmission cooler line, making sure to align it properly with the connection points.
- Step 7: Secure the line with new clamps.
- Step 8: Check for any leakage and make sure the line is securely fastened.
- Step 9: Refill the transmission fluid if necessary.
- Step 10: Start the engine and check for any leaks.
It is essential to follow the repair process correctly, ensuring that the transmission cooler line is securely fixed and free from leaks. If you are unsure or
Key Takeaways: How To Repair Transmission Cooler Line?
- Inspect the transmission cooler line for leaks, cracks, or damage.
- If there is a minor leak, try using a sealant or epoxy to fix it temporarily.
- If the cooler line is severely damaged, it may need to be replaced.
- When replacing the cooler line, make sure to choose the correct size and type for your vehicle.
- Always follow the manufacturer’s instructions and use the proper tools when repairing or replacing a transmission cooler line.
Frequently Asked Questions
Are you having issues with your transmission cooler line? Here are some frequently asked questions about repairing transmission cooler lines.
1. How do I know if my transmission cooler line needs repair?
If you notice transmission fluid leaking underneath your vehicle, it could be an indication that your transmission cooler line needs repair. You may also experience transmission overheating or shifting issues. It is essential to address these problems promptly to prevent further damage to your transmission system.
Repairing a transmission cooler line typically involves replacing the damaged line with a new one. It is recommended to consult a professional mechanic to diagnose the issue accurately and perform the necessary repairs.
2. Can I repair a transmission cooler line myself?
Repairing a transmission cooler line requires mechanical expertise and appropriate tools. If you have experience working with vehicle transmissions and feel confident in your abilities, you can attempt the repair yourself. However, it is crucial to follow the manufacturer’s guidelines and use recommended parts to ensure proper installation and prevent any future issues.
Keep in mind that improper repairs can lead to transmission fluid leaks or other complications, which can be costly to fix. If you are unsure or uncomfortable with the repair process, it is best to leave it to a qualified professional.
3. How much does it cost to repair a transmission cooler line?
The cost of repairing a transmission cooler line can vary depending on several factors, including the make and model of your vehicle, the extent of the damage, and the labor rates in your area. On average, the cost can range from $150 to $300 for parts and labor.
It is advisable to obtain multiple quotes from reputable mechanics to ensure you are getting a fair price. Keep in mind that delaying the repair can lead to more severe transmission problems and higher costs down the line.
4. Can I temporarily fix a damaged transmission cooler line?
While it may be tempting to attempt a temporary fix for a damaged transmission cooler line, it is not recommended. Transmission fluid plays a crucial role in cooling and lubricating the transmission system, and any leakage can lead to overheating, damaging other components.
If you notice a leak, it is best to address it promptly and have the damaged line repaired or replaced as soon as possible. This will ensure the longevity and performance of your transmission system.
5. How often should I inspect my transmission cooler line?
Regular inspections of your transmission cooler line are essential to detect any potential issues before they become major problems. It is recommended to inspect the line during routine vehicle maintenance or whenever you notice signs of leakage or transmission-related problems.
If you are uncertain about how to inspect the transmission cooler line or have concerns about its condition, it is best to consult a professional mechanic who can provide guidance and perform the necessary inspections.
How To Fix Damaged Transmission Cooler Line (Andy’s Garage: Episode – 62)
To repair a transmission cooler line, first locate the damaged section of the line by inspecting for leaks or cracks. Once the damaged portion is identified, use a tubing cutter to remove the affected area. Ensure that the cut is clean and straight for better results.
Next, select a replacement line that matches the specifications of your transmission cooler. Cut the new line to the required length and attach it to the transmission cooler using hose clamps or appropriate fittings. Make sure the connections are tight and secure to prevent any potential leaks.
Home - How To Repair Transmission Cooler Line?